This document explains the steps for creating and sending a mailing, describing various features of the program along the way.
- Choose a Web page or File to Send
- Create a Preamble and Plain Text Alternative
- Enter a Subject
- Specify the Recipients and the Sender
- Select Recipients
- Add Attachments
- Enter Mail Server Information
- Preview the Mailing (SPAM Detection)
- Send and Monitor the Mailing
Settings can be saved into Mailings documents for reuse, freeing you from the need to repeat them for each mailing. For more information consult the the reference documentation for each individual window.
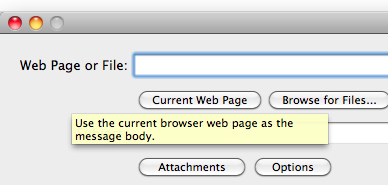
Throughout the program interface you can take advantage of "help tags" to help you learn the program. To see a help tag for a button, text field or other control simply hover your mouse over the item until it appears. For example, here is the help tag for the "Current Web Page" button that appears at the top of every mailer window:
To get started, launch Mailings. A new mailer window will display. (You can also use the "New..." command in the File menu to create a new mailer window.)
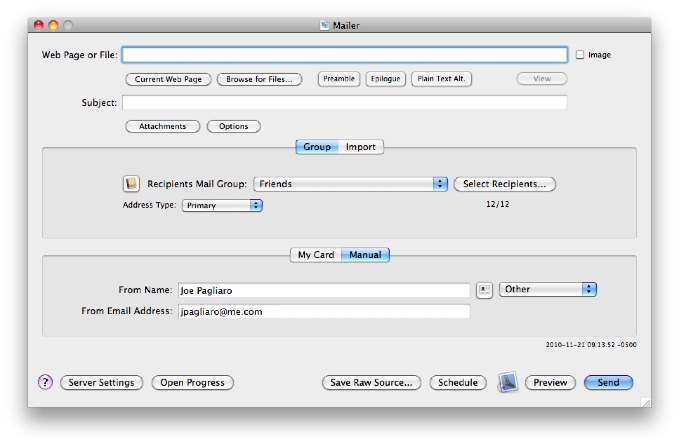
Each Mailer window consists of several parts. The top most section is where you create the content of the message. This is followed by two sections for addressing the messages, and specifying who the email is from. The last section is where you specify server settings and preview, schedule or send the mailing:
Let's get started and create our first mailing!
(Optional; you'll find out why later)
Click the "Browse for Files..." button to navigate to the file to use as the body of the message, or click the "Current Web Page" button to select the current front URL displayed in your web browser. This feature is currently supported by most common Mac browsers such as Safari, Firefox, Camino, OmniWeb, Opera, Flock and Google Chrome.
You can also manually enter the URL of the document you want to use into the "Web Page or File" text box. The "https://" protocol is the default, so you do not need to include it. Files are specified by their path. If you are sending an HTML page which contains images then those images should reside on a web server so that the client can receive them (although Mailings supports HTML with embedded images. See Attachments.)
The "View" button can be used to open the URL in the appropriate application. Mailings only conducts a search for an appropriate application when you use the "Browse for Files..." or "Current Web Page" buttons, otherwise the "View with..." button is disabled.
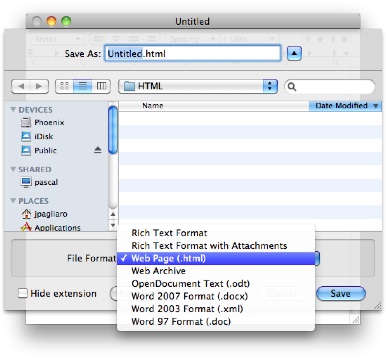
Note that you can send the equivalent of a rich text formatted document using TextEdit and saving the file as a web page (HTML) and then drag that file into the "Web Page or File" to set it as the body of the message:
At the top of the Mailer window, adjacent to the "View" button are three buttons labeled "Plain Text Alt.", "Preamble" and "Epilogue":
When you click these buttons a message editor window will be displayed for creating a "Plain Text Alternative", "Preamble" or "Epilogue", respectively. All the editor windows are identical in form and function. The only difference is how the content of each is used when building mail messages.
A "Plain Text Alternative", or PTA, as the name suggests, is a plain text message, with no HTML, which the client may choose to view rather than the HTML message. It is useful to include a PTA when you are sending an HTML based email.
If the file you are sending is HTML then the "Preamble" and "Epilogue" will be messages, usually with HTML markup, that will be either prepended and/or appended to the body of the message. If you are not sending a web page or file, then any of these editors can be used to compose the body of the message (and this is why "Web Page or File" is optional.)
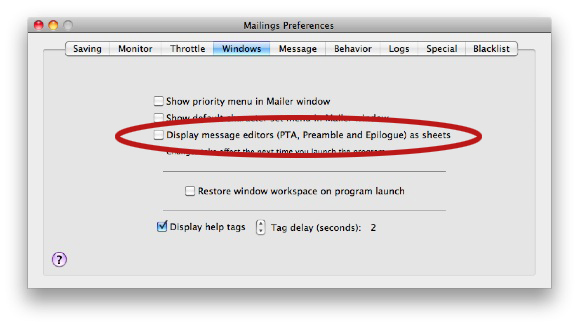
You have the option to display message editor windows either as sheets, attached to the Mailer window, or as independent windows. Specify this option on the "Windows" pane of the "Preferences" window. Select "Preferences..." from the Mailings menu, then click the "Windows" tab:
The main body of the email can be prefaced by a preamble. To create a preamble click on the "Preamble" button to bring up the preamble editor sheet or window.
The preamble above contains HTML paragraph formatting tags, as well as a "template tag". Template tags enable you to personalize messages and insert other information specific to the recipient. In the preamble above the tag is {ToNameFirst}, and will be replaced by the first name of each recipient for every message generated. You can use the popup menus at the top of the editor window to insert template tags.
To delete a preamble, just delete all its text. Preambles should be formatted using HTML if the body of the file specified by the "Web Page or File" text field is HTML, as in the example above.
You can also specify a "plain text alternative" when the body content is HTML. Use only plain text to create the "plain text alternative"; it should not contain any HTML because the formatting will not be applied. This is useful when the recipients mail reader can not process HTML, or the recipient prefers not to display HTML. In this case the mail reader will probably use the plain text alternative as, well, an alternative to the HTML formatted message you are sending. The plain text alternative might contain information on how the user can access the same HTML content on the web using their web browser.
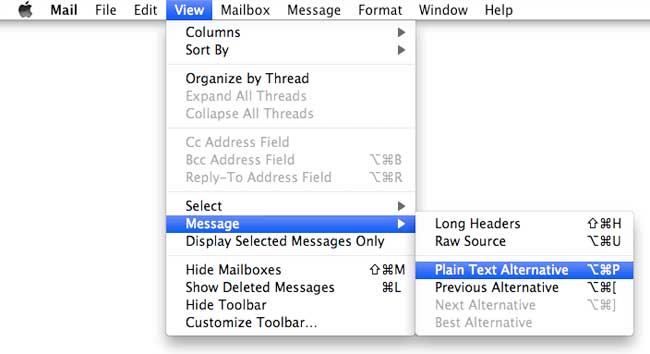
In Mail you can view the plain text alternative using the "View > Message" menu item:
(Optional, but advisable!)
The subject line may be automatically set after selecting a file or web page, but of course you can enter your own. (This feature can be turned off in the Preferences.)
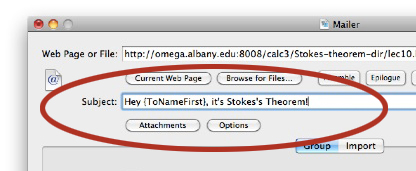
An interesting feature of Mailings subjects is that they can be templates. In other words you can include a template tag inside the subject, for example as shown:
Each recipient will then receive an email whose subject is personalized with their first name. (Since template tags can actually be AppleScripts, which themselves may contain template tags, you can create quite dynamic subject's.)
(Required)
Mailings sends mail to groups you create in Address Book, or to addresses imported from tab or comma separated plain text files.
To use Address Book, select the "Group" tab:
The "Recipients Mail Group" popup button on the "Group" tab enables you to select any of the groups currently in Address Book, or to select all people in Address Book.
Select the type of addresses you want to use: "Primary", "Distribution", "Work", "Home", "All" or "Other" from the "Address Type" popup menu:
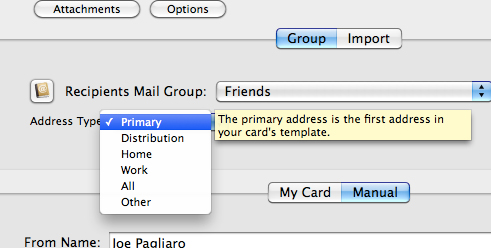
Here's a brief description of the address types:
Primary. Mailings will send the mail to all the primary addresses of each recipient. This is the original email address of the person.
Distribution. Mailings will send the mail to all the addresses of the Distribution list for the group. To create a distribution list use the "Edit Distribution List..." from the "Edit" menu in Address Book.
Work. Mailings will send the mail to all the work addresses of each recipient that has at least one work address.
Home. Mailings will send the mail to all the home addresses of each recipient that has at least one home address.
All. Mailings will send the mail to all the addresses this recipient has, of type work, home, as well as addresses with any other labels.
To use a tab (or comma) separated text file, select the "Import" tab:
The "Import from..." popup menu on the "Import" tab enables you to specify an import file to read the addresses from. (Note: You can also use this menu to select an Entourage group to import from.)
The import file must consist of lines (specified with a carriage return, new line or both) which include each recipients name and email address. The recipients name, if it is present, is separated by a tab (or comma.) The order of email address and name per each line is not important.Also note that this tab provides the option to add the imported address to the Address Book. They will be added to a group that is named after the file being imported, provided such a group does not already exist. Moreover, Mailings will not add a person whose name would result in a duplicate entry.
A typical line entry in such a file would have entries like any of the following (with no extraneous spaces):
(Persons First Name)(tab or comma)(Persons Last Name)(tab or comma)(Persons email address)(carriage-return)
(Persons Name)(tab or comma)(Persons email address)(carriage-return)
(Persons email address)(tab or comma)(Persons Name)(carriage-return)
(Persons email address) (carriage-return)
Choose the sender of the emails using the "My Card" or "Manual" tab.
You can use one of the addresses on the "My Card" card in Address Book using the "From me at" popup button.
When addressing the email with the Sender's name you can have Mailings use either your personal name or your organization name. If you have an organization name on your "My Card" then check the checkbox to use that name:
As an alternative to using the "My Card" you can manually enter the sender's name and email address:
If you click the Address Book button on the "Manual" tab the "People Picker" window will be displayed. You can drag a person from the People Picker window into the name or email address text fields to specify the sender too:
(Note: If you make changes to information in Address Book while Mailings is running, Mailings will automatically update itself when you activate it.
(Optional)
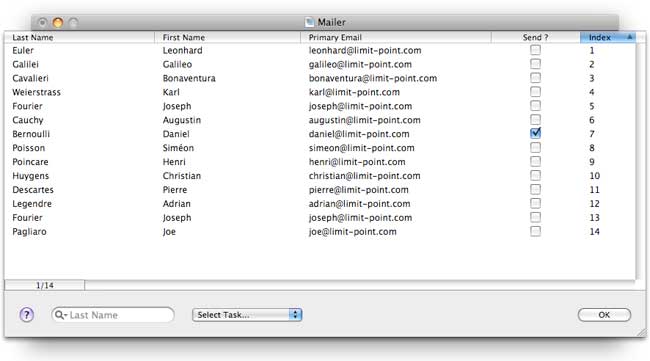
Clicking the "Select recipients" button enables you to choose which members of the selected group or imported file are actually emailed. This is determined by whether or not the recipient has a checkmark in the "Send?" column of the list. If the recipient does have a checkmark we say they are flagged for sending, otherwise they are un-flagged.
You can use "type-select" or the search field to find specific individuals in large lists to flag or un-flag them,. Note that the email address column name indicates which type of address (home, work, other or all) has been selected in the mailer window using the "Address type" popup menu:
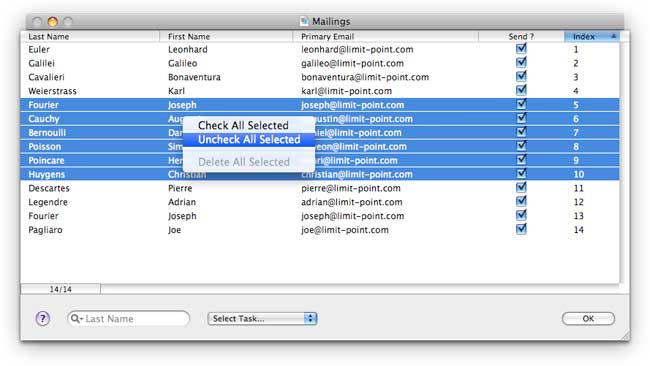
You can "drag select" using your mouse, and then "control-click" to bring up a contextual menu which enables you to flag/un-flag all the selected items at once. When starting such a drag, click off the text of a recipient - i.e. you have to click in "white space" to start the drag. Conversely, to bring up the contextual menu you need to "control click" on the text in the selection (otherwise Mailings just selects the line you clicked on.)
Use the "Select Task..." popup menu at the bottom of the Select Recipients window to perform various tasks on the list. As with most user interface items if you hover the mouse over a menu item in this menu a help tag will display explaining it's functionality:
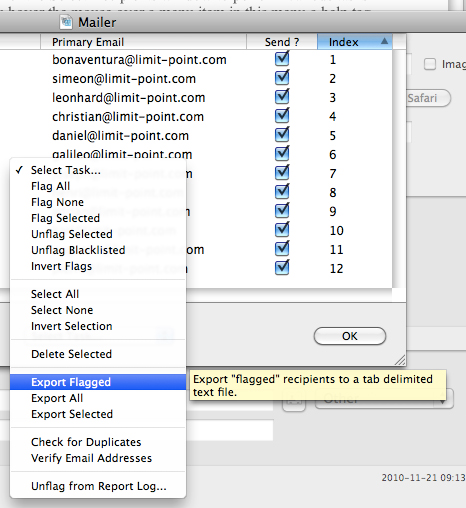
The two items "Check for Duplicates" and "Verify Email Addresses" in the "Select Task" menu are of particular interest. The first, "Check for Duplicates", will scan the list to find all entries which have duplicate email addresses, and select all that it finds. The second, "Verify Email Addresses" will check each email addresses "syntactic" form to make sure it is valid. For example, an email address can not contain certain characters, such as parentheses or spaces.
One of the most useful features of the Select Recipients window is that after you send a Mailing only people that had an error will be remain selected:
This makes it easy to resend your mailing only to those people who had an error on the previous attempt. If there were no errors Mailings will restore (by default) the originally flagged recipients. You can use the preferences to turn this feature off.
(Optional)
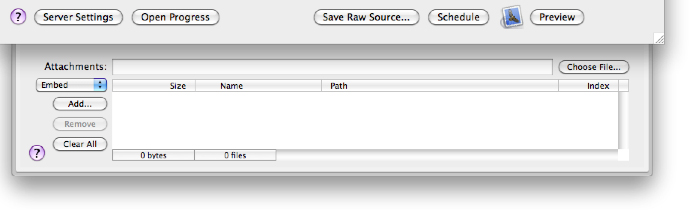
At the bottom of every mailer window is a "drawer" which is used to add attachments to the message. If the drawer is not open, click the "Attachments" button at the top of the mailer window:
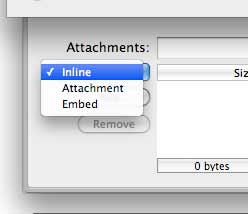
Attachments can be of three types:
Inline: This indicates to the mail client you want it to try and display the attachment if it can. For example, if you attach a text file, and want the text to display inside the message use this option.
Attachment: This indicates to the mail client you don't want it displayed, or it doesn't need to be displayed.
Embed: Attachments of the embedded type are usually used for displaying attached images inside the HTML content of the message. This is useful if you can't store the images on a web server. The software distribution contains examples of using embedded attachments. See the "Tour Samples" folder, which is used as part of the Mailings Tour.
Drag files of any type into the list to add attachments to the email. If you drag a folder, you have the option of having Mailings attach all files in the folder, or creating a zip archive of the folder and sending that. (This option is specified in the Preferences.) There are also options to convert text attachments to PDF or split multi-page PDF's into several single page PDF attachments.
(Required)
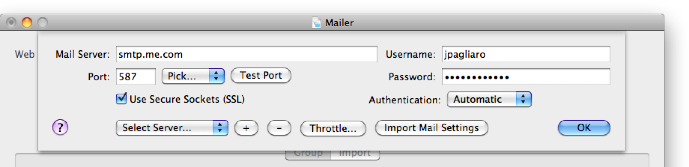
Open the Server Settings window by clicking the "Server Settings" button. To configure the mail server to use for mail delivery enter its address in the "Mail Server" text field, and the appropriate port number in the "Port" field (common ports are 25, 465 and 587):
If your mail server requires authentication be sure to specify the username and password, and select an authentication method from the "Authentication" menu.
Use the "+" button to save your settings. Saved settings are then accessible from the "Select Server..." popup. Use the "-" button to remove a server setting.
(Recommended!)Click the "Preview" button at the bottom of the mailer window to verify that the message looks as you expect, and you can also verify if your email looks like SPAM using the built in spam detector of your mail client (Mail, for example, has quite strong SPAM detection)
When you preview a mailing it is actually sent to the you and displayed in your default mail client. Your mail program is automatically opened for you (unless you turn this feature off using the preferences; see below.)
Mailings uses the address and name of the sender for preview.
If your preview email message winds up in your junk mail folder you can safely assume the message you are sending looks like spam.
There is another way to preview a mailing, by clicking the "Save Raw Source..." button at the bottom of the Mailer window. This will cause Mailings to generate the raw source of the message, saving it to an "eml" file which can be opened in any mail client that display raw source, such as Mail.
(Optional, but uhm...)
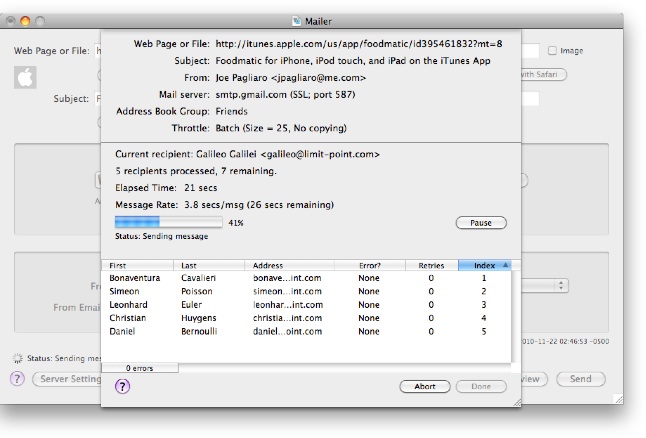
Once you have previewed the mailing and it looks good you can send it by clicking on the "Send" button. A progress sheet will be displayed, and the mailing will begin:
As a mailing is in progress you can pause or abort it at any time using the "Pause" or "Abort" buttons.
Using Preferences you can specify an option to start a mailing in the "paused" state.
The Progress window displays any errors that occurred when Mailings was trying to deliver the mail to the mail server. You can try to resend to those people with errors at a later time because Mailings will save the list of recipients with errors. To view them use the "Select Recipients..." button in the Mailer window, only those people with errors will be flagged. That way when you click "Send" again only these recipients will be mailed.
At the end of a mailing an HTML formatted log file will be generated. You can access the location of the Report Logs using the "Report Logs..." menu item:
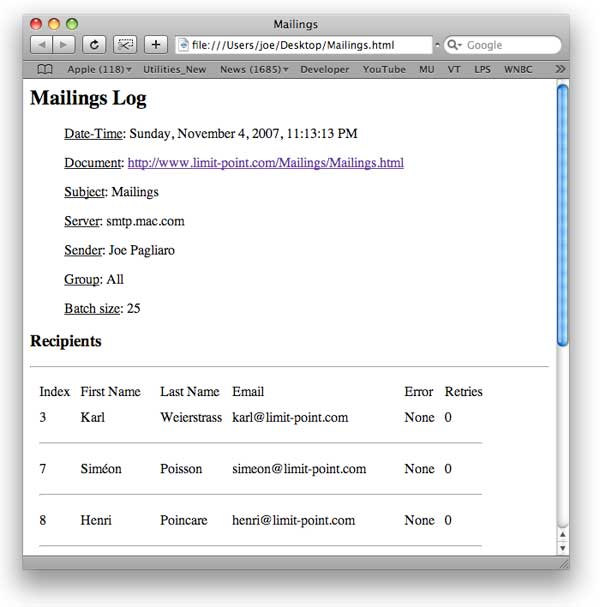
Here is a sample report log:
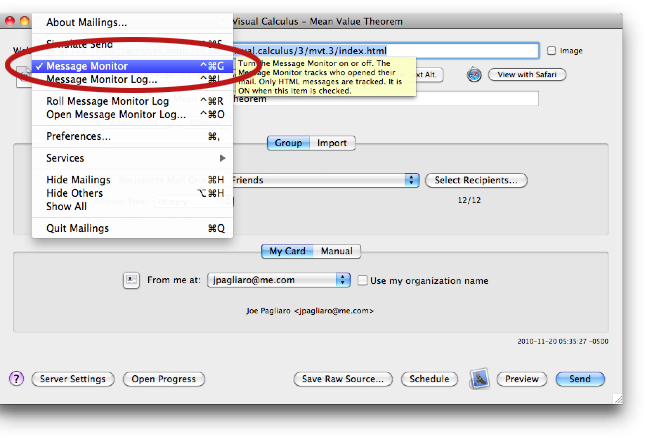
Message Monitor: A simple, optional method for detecting the opening of messages.
Once you get the mailing out, and your recipients begin to read the mail you sent them, you have the option to watch if, and when, your email messages are opened. This can be done with the Message Monitor.
This is accomplished as follows:
1) When Mailings has this feature "on" it creates an internal web server , using the IP address of the machine running Mailings, and the port you select in Preferences.2) When Mailings composes your messages it inserts a small empty image link inside it - you won't be able to see it when you read the message. The link inserted will have the IP address Mailings is at, and port Mailings is using to communicate on.
3) When this message is received and opened by the recipient their mail client will make request for the image.
4) Mailings receives the request, which contains information about the receiver (name and email address, and mailer ID)
5) Mailings saves this information as a receipt that the message was received.
This feature requires that Mailings runs on a computer that can be accessed from the internet. For a machine on a LAN this can be accomplished by opening up a port on your router to point to the machine running Mailings. You can also use services such as dyndns.com to forward a domain name to your dynamic IP address.
The Message Monitor currently must be turned on prior to sending out an emailing because it participates in the mailing by inserting the link in the HTML message body. The Message Monitor can only listen to email messages which are HTML and have a certain tag embedded inside them. As a web server it connects to the outside world via a port on your computer. So the first thing you need to do is set the desired port it uses. This is done using the Preferences window. Set the port on the "Monitor" pane of Preferences:
Note: Port numbers must be between 1024 and 65535, and you should choose a port that is not in use. You can use Terminal and "netstat -a" to find which ports are available. Alternatively, you can set the port to 0 and the system will provide an available port, which you can then copy into the text field as the permanent port to choose. (Message Monitor does not have to have the same port all the time it runs, but it is preferable. Using the value 0 will result in a different port each time.)
Now all you need to do is turn it on. Select "Message Monitor" from the Mailings menu to "checkmark" it:
You use the "Message Monitor Log" window to view the requests coming in.